Blocking specific websites on all your devices can help you reclaim your calm, focus, productivity, and even rest.
Not to mention the undeniable benefits of protecting children from overexposure to various kinds of online content.
In this article, we will cover all the different ways in which you can block a specific website from a device.
Here’s what you can expect:
- Foolproof method: Block websites with a parental control app like Canopy
- Windows Method: 18 steps to blocking a website on Windows computers
- Mac Method: 7 steps to blocking a website in ALL browsers on Mac
- Mobile Method: How to block a specific website on your iPhone/Android
We’ve written guides from almost every device and browser, so just follow the links for more detailed guidance throughout.
Foolproof Method: Block Specific Websites With a Parental Control App
The simplest method for blocking a specific website on any device would be to use a Parental Control App or Adult Content Blocker.
An app that works on multiple devices, such as Canopy, would be the most convenient solution.
For example, Canopy can block:
- Specific websites
- Specific apps
- An entire category of content (such as social media, gambling, or porn; whatever you don’t want to see on the device)
- Inappropriate images, wherever they are (you don’t even need to block websites, the images just won’t appear).
Blocking a website with an app is on top of our list because it is by far the fastest, easiest solution there is.
All you need to do is install the app on the device you want to protect, add the URL or app name you want to block, and voila! No more unwanted content.
Not only that, but compared to browser extensions, an app such as Canopy blocks a website on all browsers on the device. A browser extension, while also convenient, works just for that browser and can be easily bypassed by opening a different browser.
Here is a step-by-step demonstration on how easy it is to use Canopy.
How to block a specific website permanently with Canopy
1. To block any website on any device, you first need to create an account on Canopy (here’s a link to a free 7-day trial).
2. Then, you will need to download the Canopy for Kids app on the device you want to protect from unwanted content.
- Here’s how to do that on Windows.
- Here’s how to do that on Mac.
- Here’s how to do that on Android.
- Here’s how to do that on iOS.
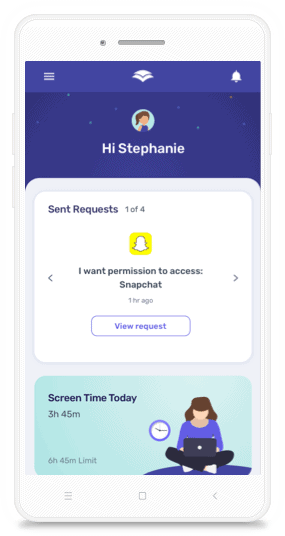
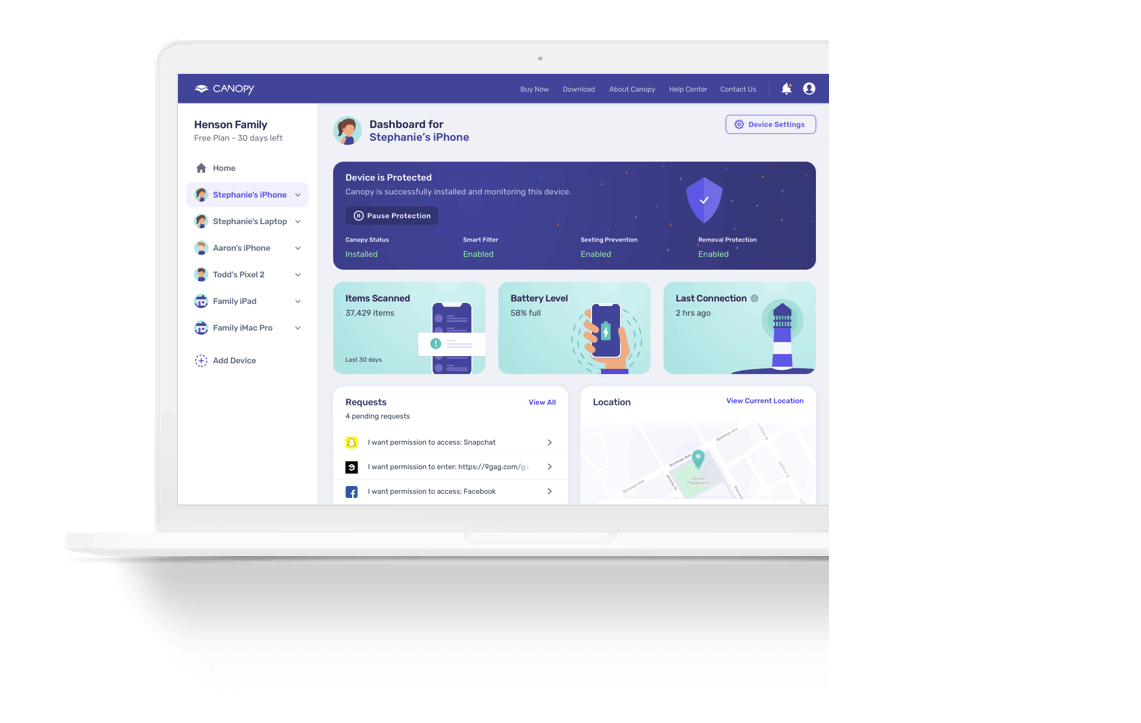
3. Once you have Canopy installed on your desired devices, it’s time to set up the protection filters. To block a specific website, log into the Canopy web dashboard, or open the Canopy for Parents app on your device.
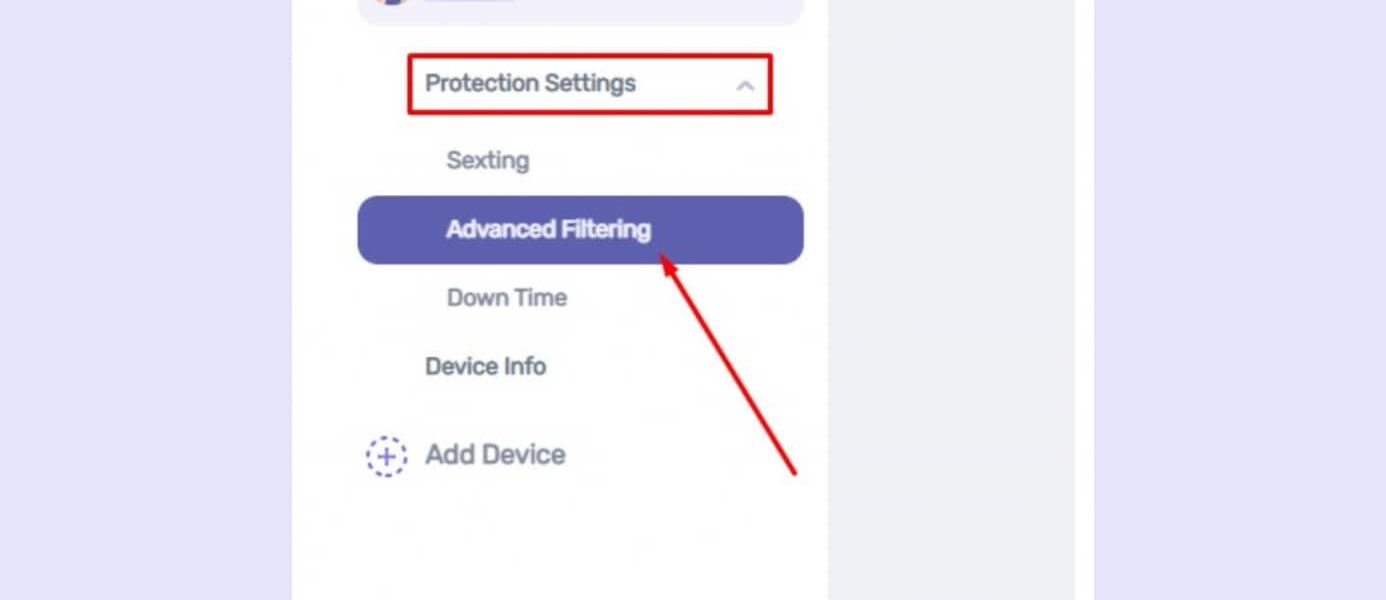
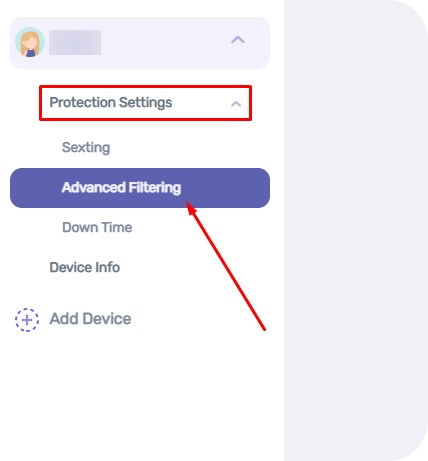
4. On the left-hand side of the screen, select the child whose device you want to protect. Go into Protection Settings, then Advanced Filtering.
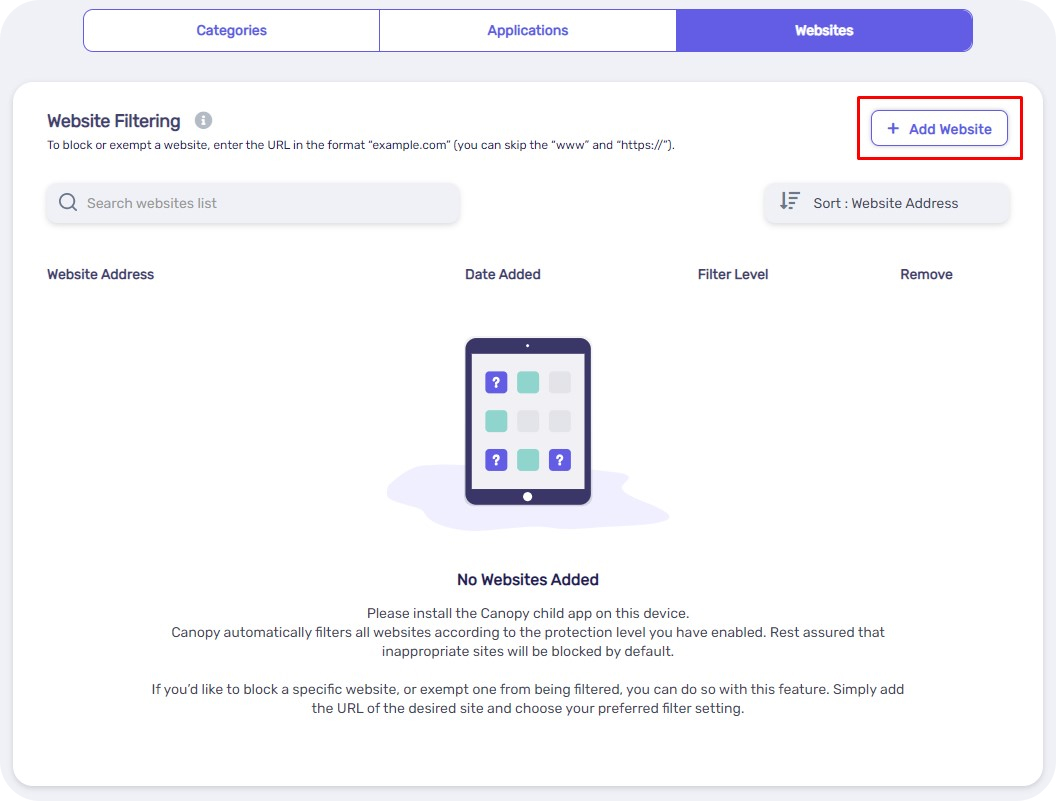
5. In the main dashboard, make sure the Websites tab is selected. In the upper right corner, click on + Add Website button. A new window will open.
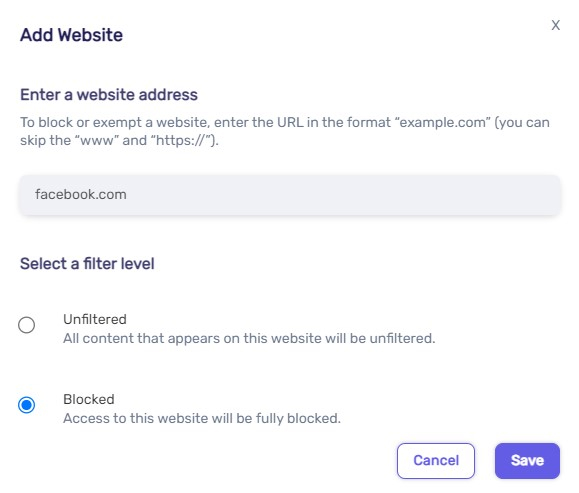
6. In the new window, add the URL of the website you wish to block completely like in the example below. Select your preferred filtering level, and then click the Save button.
7. Congrats! You successfully blocked a website from your selected device completely and permanently.

2. How to Block a Specific Website on Windows (All Browsers – For Free)
If you’re not interested in using an app, there are other methods to fully block a website from a device.
These are more challenging and require more advanced computer knowledge (such as flushing your DNS cache and similar), but they’re not impossible to implement.
Note: This method requires administrator access to Windows software, meaning it is not likely you can use it for school or public computers.
Here’s a guide on how to block access to specific websites on Windows, for all browsers.
Follow these 18 steps
1. Click the Windows Start button in the bottom left of your screen. In the menu that opens up, type ‘notepad’ to find the Notepad app.
Once its icon shows up, right-click on the Notepad icon and select Run as administrator.
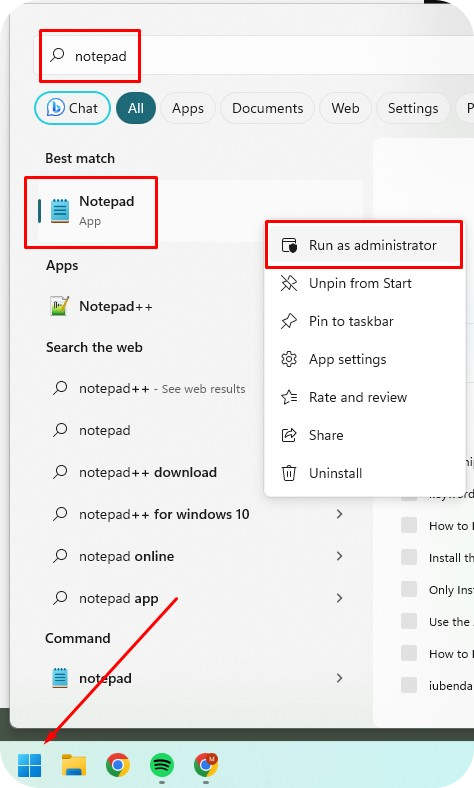
2. A dialogue will pop up, asking you if you want to allow the app to make changes to your device. Click Yes.
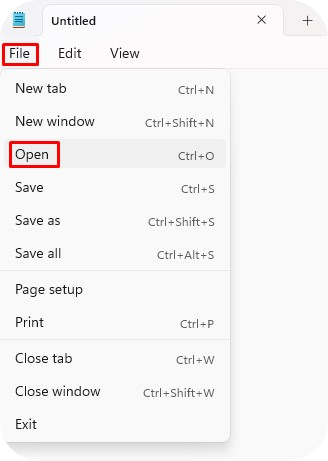
3. Once Notepad opens up, click File > Open.
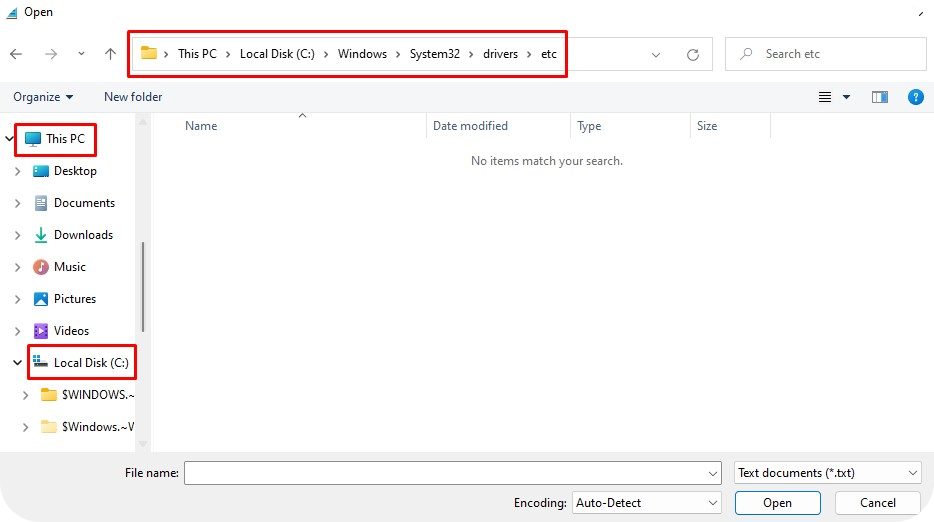
4. Find the ‘etc’ folder. In the left-hand navigation start from This PC, then find your hard drive’s name (typically C:).
Then follow this path: Windows > System32 > drivers > etc by double-clicking on each of those folders until you get to the seemingly empty etc folder.
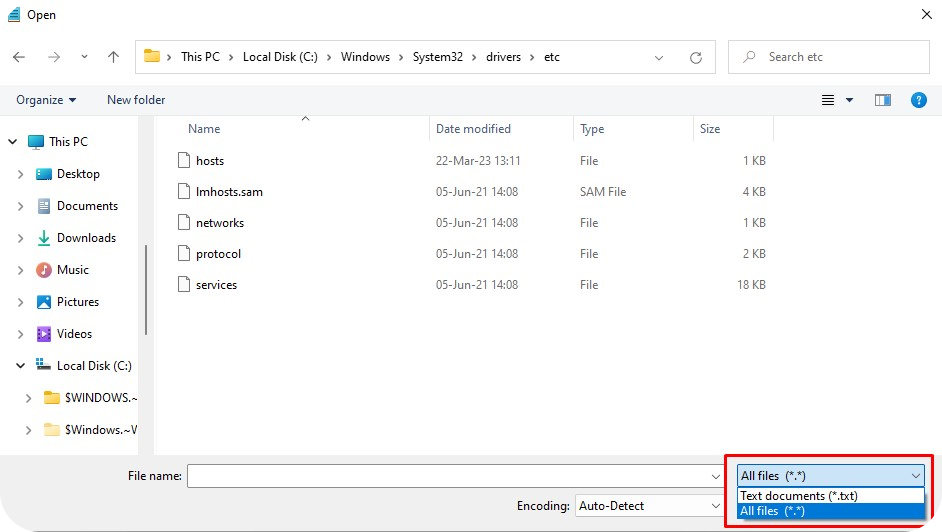
5. In the bottom right of the popup window, open the drop-down menu next to Text documents (*.txt) and choose All files (*.*). Hidden files will appear in the etc folder.
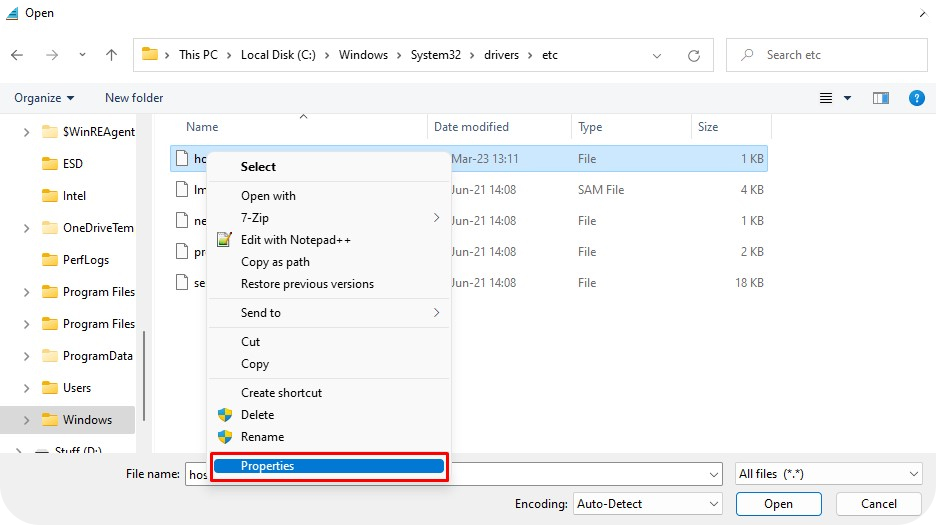
6. We are interested in the file named ‘hosts’. Right-click on the ‘hosts’ file and choose Properties at the bottom of the menu. A new window will open.
7. Make sure that the Security tab is selected. Without changing anything else, click the Edit button.
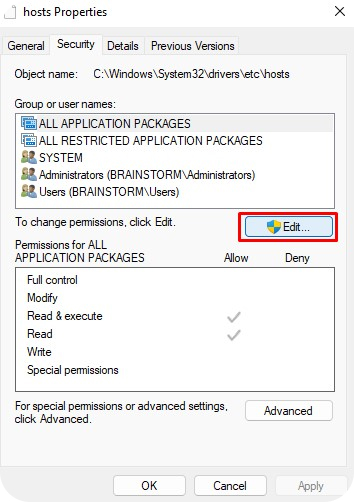
8. You will now have the ability to check and uncheck boxes in the Permissions for ALL APPLICATION PACKAGES field. Check the Allow box for Full control. Other boxes will then automatically become checked as well. Click Apply.
9. Windows will ask you whether you are sure you want to make these changes. Click Yes.
10. Click OK to close the popup window.
11. Now that we have removed security from the ‘hosts’ file, you should select the file and click Open.
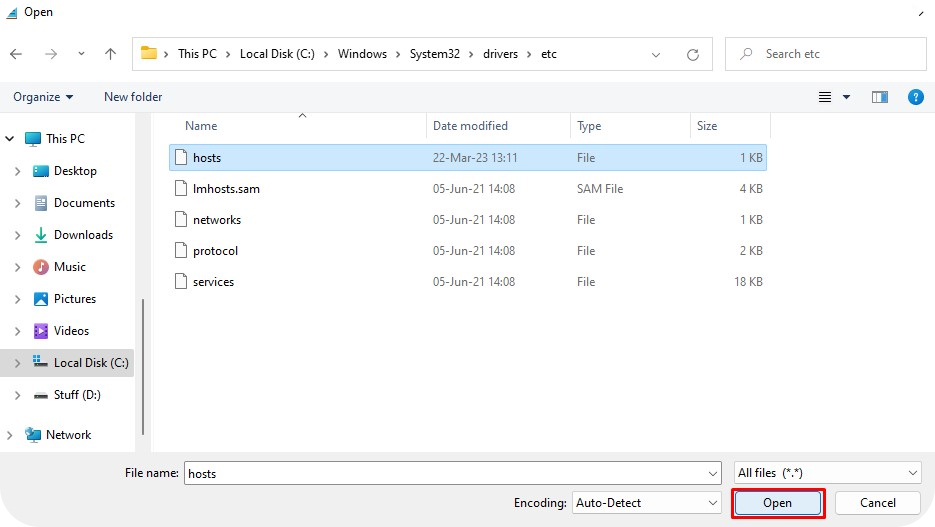
12. The ‘hosts’ file will open in your Notepad. This is where you add the websites you wish to block from all browsers on your Windows computer.
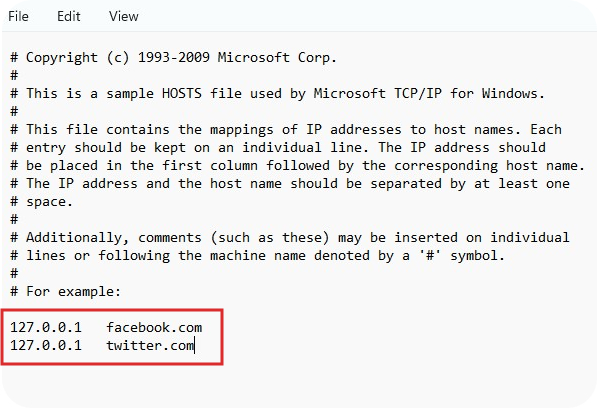
To do so, go to the last line of the text file and press Enter. This will create a new line. In it, type: 127.0.0.1 and press Tab on your keyboard.
Type in the address of the website you want to block without the www (see below).
You can add as many websites as you want like this.
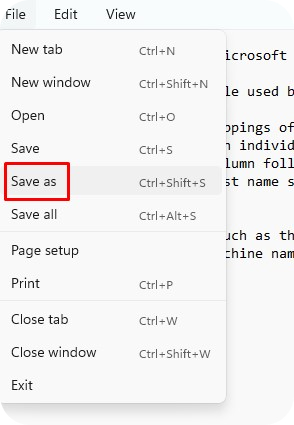
13. When you’re finished adding websites, you need to save the ‘hosts’ file in a way that overwrites the previous ‘hosts’ file.
Go to File > Save as.
14. In the window that opens, make sure that the All Files (*.*) option is selected again. Then, select the ‘hosts’ file. Click Save.
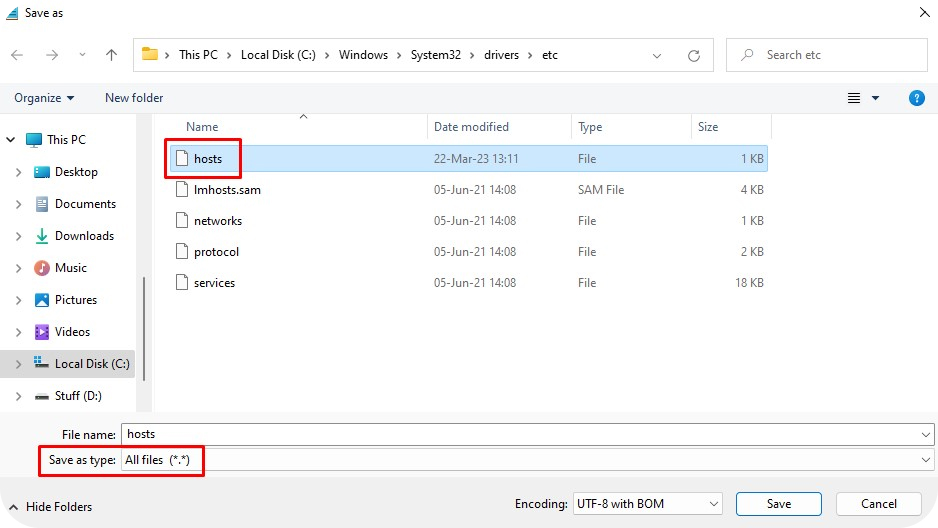
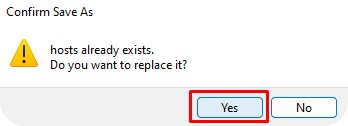
15. Windows will ask whether you’re sure you want to replace the existing ‘hosts’ file. Click Yes. Close Notepad.
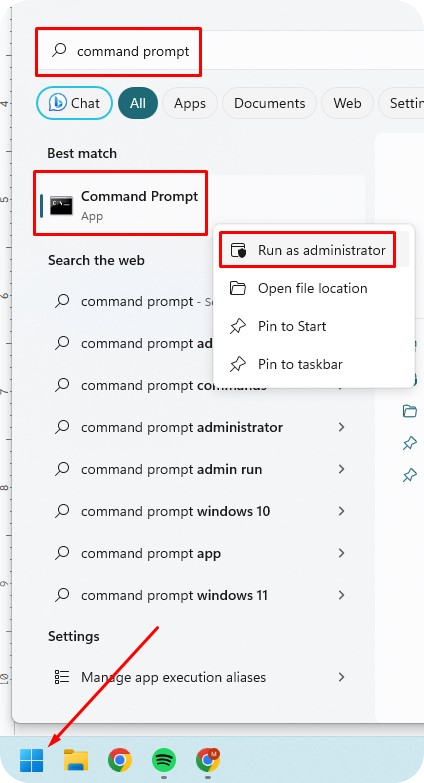
16. Before we test whether our blocking method works, we need to flush the DNS cache on our PC.
Click the Windows Start button. Type in ‘command prompt’ in search. Right-click on the CP icon and select Run as administrator. Click Yes to confirm.
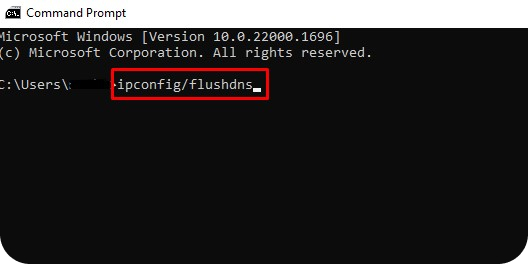
17. Type in ipconfig/flushdns into the command prompt line. Press Enter.
18. After successfully flushing the DNS cache, close Command Prompt.
Now, you need to restart all your browsers. Close any browser windows you have running and reopen them.
The websites you have added to your block list in your ‘hosts’ file should now be blocked in your browsers.
Got a Google Chrome browser on a Windows computer? Follow these extra steps to block specific websites
You may have noticed that, while the above method works flawlessly on most Windows browsers, it does not work on Google Chrome.
To make this method work on Chrome as well, you need to add a new line for each website you want to block in your ‘hosts’ file – the same website address but with its full URL. Refer to our image below on how to do this properly.
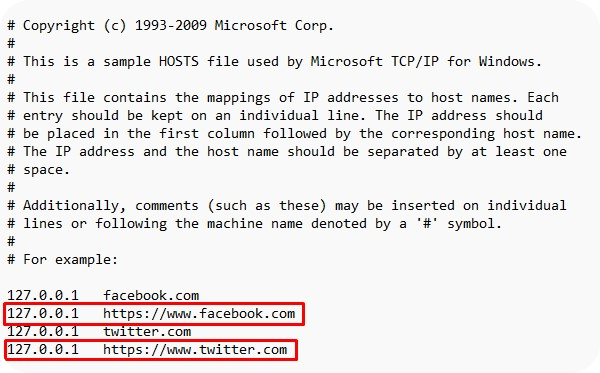
Don’t forget to flush your DNS cache and restart your browser after you finish this as well!
If, by any chance, the Chrome browser is still opening the website, you might need to restart your computer.
No need to worry about your kid opening a bad website.
- Website Blocker for Adults
- Parental Control App for Teens & Kids
3. How to Block a Specific Website on Mac in 7 Steps
This method for blocking a website on Mac is pretty much the same as for Windows above, in that it includes accessing and changing the host file to your computer.
Let’s go through it step by step.
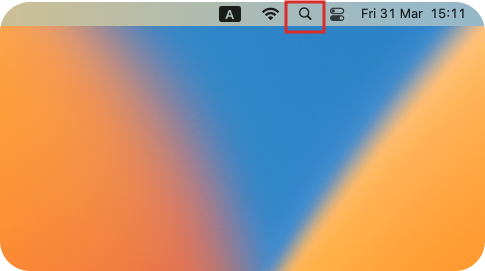
1. Click on the magnifying glass icon in the upper right corner of your Mac screen to access Spotlight.
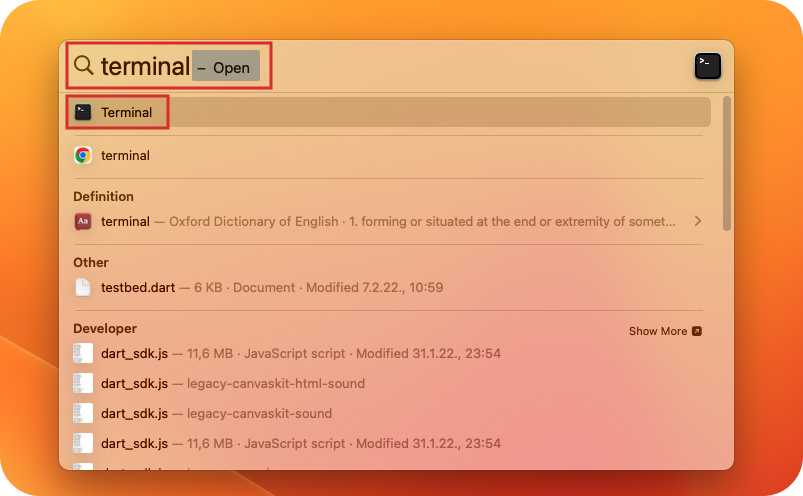
2. Type in Terminal and click on the Terminal app to open it.
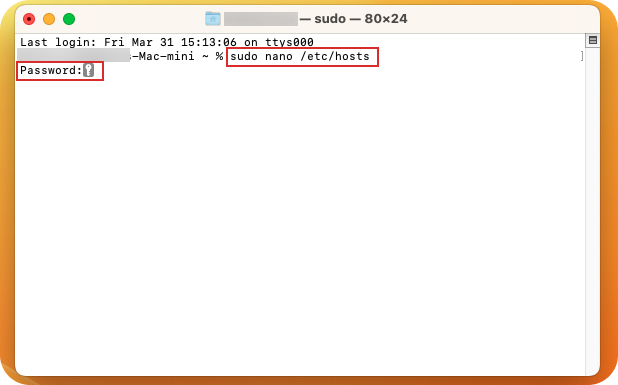
3. Type in the following: sudo nano /etc/hosts (yes, with that space in between ‘nano’ and /) and press Return.
Type in the password to your Mac computer when prompted in the Terminal. The Terminal won’t show your password characters as you type.
Press Return.
This will open the ‘hosts’ file to your computer where you will define which websites you want to block.
4. At the very bottom of the text in the ‘hosts’ file (to which you can navigate by pressing the arrow down key), you need to add a new line by pressing the Return key on your keyboard.
Type in the following numbers: 127.0.0.1
Press Tab on your keyboard, and then add the address of the website you want to block without the ‘www’. (Refer to the image below.)
You can add as many websites to your block list as you want in this way.
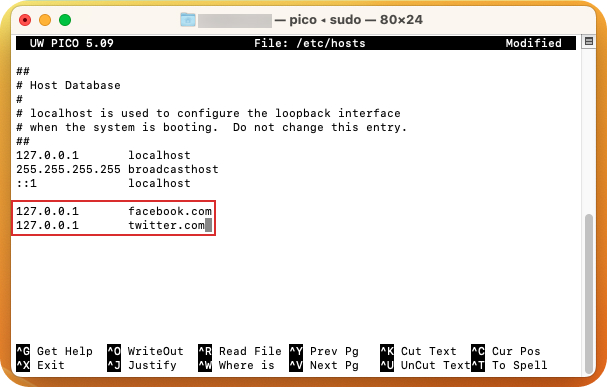
5. The previous step works for most browsers on a Mac, aside from Google Chrome. For Chrome, you will need to add a few more lines to your ‘hosts’ file.
Press Return to create a new line. Type in 127.0.0.1 again and press Tab.
This time, add the full address of the website you want to block on Chrome (with the ‘https://www’ part. Refer to the image below.
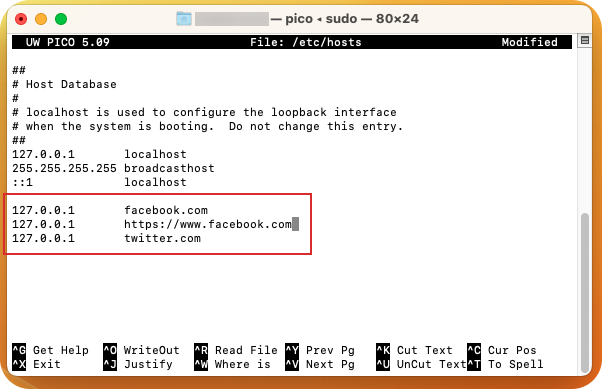
6. Once you’re happy with your block list, press Control + O and then Return to save your new ‘hosts’ file.
Press Control + X to close the file.
7. Just like in our Windows step-by-step above, the final step here is to flush your DNS cache.
Do this by typing in: sudo killall -HUP mDNSResponder into Terminal and then hitting Return.
You will need to type in your password again for this to work.
This will erase the DNS cache, meaning all the data about the blocked websites that existed is now gone. They should be now blocked from all browsers on your Mac.
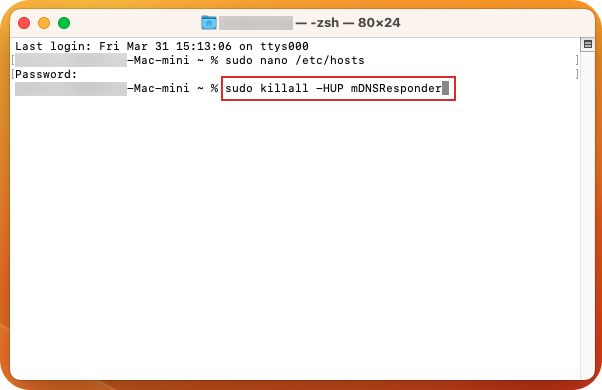
You may need to restart your computer for all these changes to take effect. No more unwanted content on your Mac!
4. How to Block a Website on iOS and Android
By blocking porn websites on your computer, you are only solving part of the problem.
You still need to block this type of content on your phone and/or tablet. After all, these are probably devices that you use on a daily basis, too.
Here are some methods for blocking porn on Android and iOS (other than the Canopy app we mentioned above, that is).
How to Block Specific Websites on iPhone
We wrote a full guide on blocking specific websites on iPhone here.
- Use Screen Time
Screen Time is iOS’s native feature that you can use to implement all kinds of restrictions on device usage and access to the internet.
With Screen Time Content & Privacy Restrictions, you can:
- Limit the amount of time an Apple device can be used.
- Restrict purchases and downloads of certain app groups.
- Block access to specific websites – or allow access only to specific websites.
- Restrict content consumed not only online but also in books, movies, and TV shows, and more.
A big downside to using Screen Time is that it works for blocking adult web content only in Safari. If the restricted device is running any other types of browsers, Screen Time restrictions won’t work on them.
- Use Family Sharing (parental controls)
Another way to block a website on iOS is by activating the Family Sharing feature for all Apple devices your family members use.
Family Sharing allows for more control over what your child can or cannot do on their iPhone or iPad compared to Screen Time.
For example, whenever your kid attempts to subscribe to something or makes a purchase, the Family Sharing Ask to Buy feature can ping your device to ask for permission.
However, parental controls in Family Sharing work only for children under the age of 13. They also obviously don’t work on non-Apple devices.
Read more in our full guide to blocking porn on iOS.
How to Restrict Websites on Android
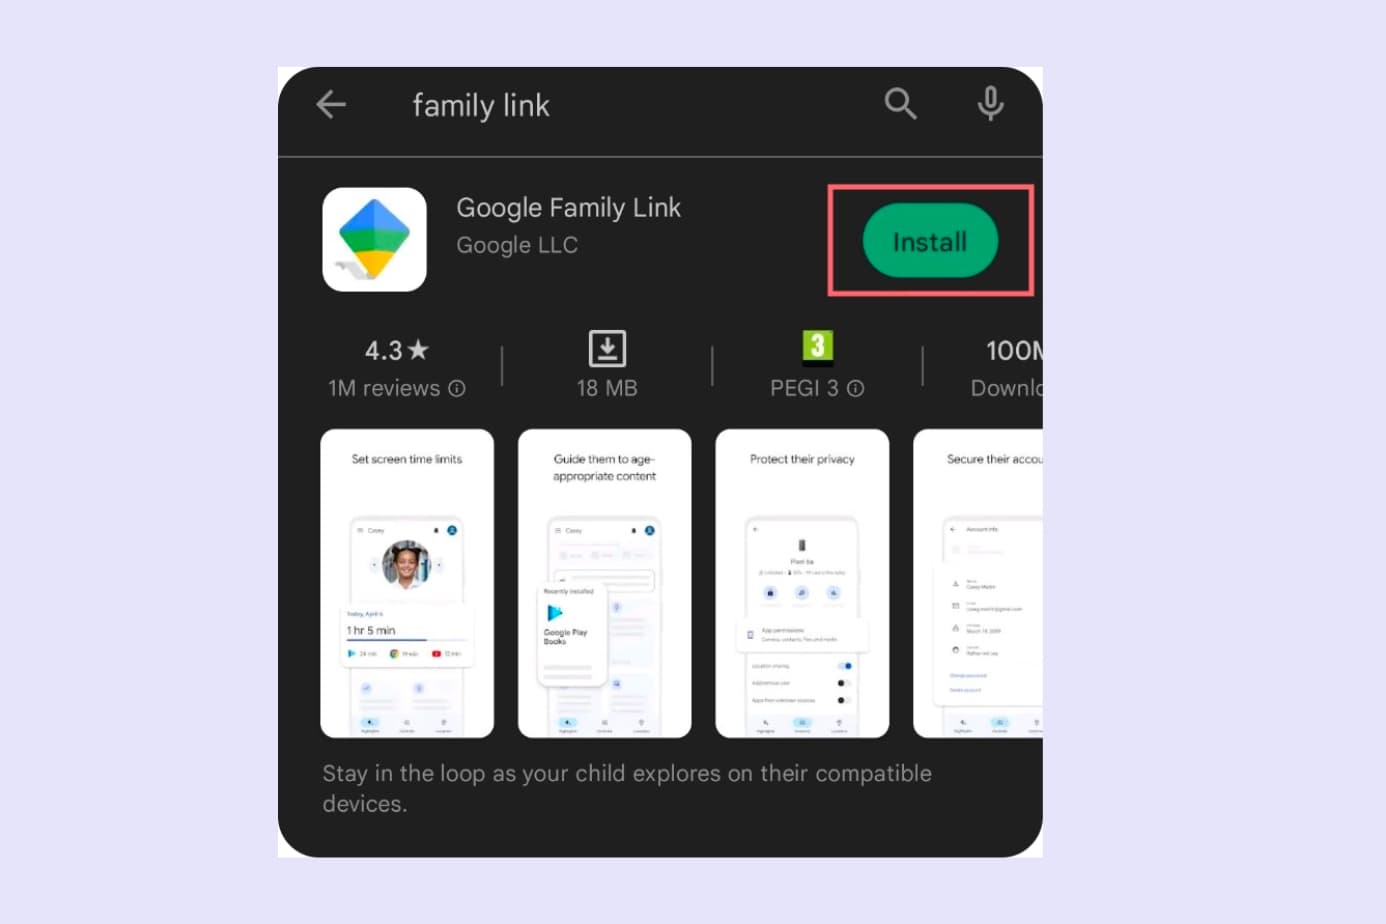
- Google Family Link
A good option for blocking specific websites on Android is using the Google Family Link app. With it, you can block specific adult websites (or any other type of website), but you can also block Google Play downloads.
However, blocking specific websites works only for Google Chrome.
With Family Link, the best you can do for other browsers is to turn SafeSearch on, which will filter out (most) adult content but won’t allow you to block specific websites.
- Safe browsers
A step up from Family Link is using a safe browser, or a browser that has adult websites blocked by default (without any additional settings).
The downsides to this option are that some safe browsers allow you to whitelist websites, and you will still be free to download other browsers and use them (unless you combine this with a method for blocking app downloads as well).
For more options on how to block unwanted content on Android, read our guide to blocking porn on Android.
So, What Is the Best Way to Block a Specific Website?
From our research, the most effective way to completely block a website from any device (permanently) is to use a blocker app such as Canopy.
All other options are either too complicated (such as changing the host file to your computer system) or have ways to get around them (like native phone settings).
But hey, good news! Canopy is free to try, so why not give it a go?
Related Website Blocking Guides
Check out other guides in our complete internet safety series:
- How to Block Websites on a Router
- How to Block Websites on Your Phone (Permanently!)
- How to Block Websites on Safari Browser
- How to Block Websites on Any Computer
- How to Block Websites on iPad
- How to Block Adult Websites on iPhone
- How to Block Specific Websites Only
- How to Block Websites on Chrome Mobile
- How to Block YouTube Content
- 7 Best Porn Blockers
